
OpenID Connect is supported in Dependency-Track 4.0.0 and above
In the context of OAuth2 / OIDC, Dependency-Track’s frontend acts as client while the API server acts as resource server (see OAuth2 roles). Due to this, the frontend requires additional configuration, which is currently only supported when deploying it separately from the API server. Refer to the Configuration and Docker deployment pages for instructions. The “bundled” Docker image and “Classic” Dependency-Track deployments using solely the executable WAR are not supported!
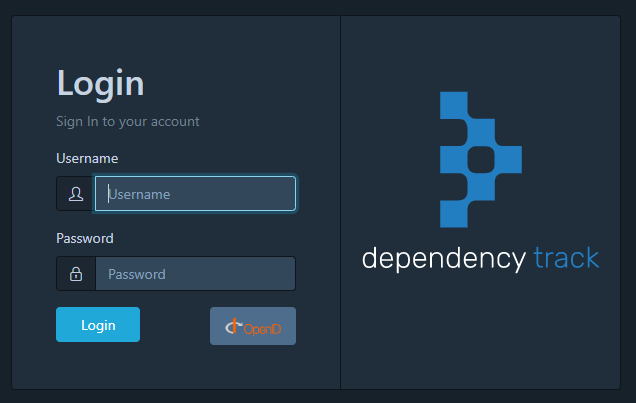
If configured properly, users will be able to sign in by clicking the OpenID button on the login page:
NOTE: the front-end will not display the OIDC login button if the Dependency-Track service is unable to connect to your OIDC server’s
.well-known/openid-configurationendpoint. The server logs can help you identify whether this is an issue with firewall rules, internal TLS certificates, or other errors which may be preventing that communication.
Before v4.3.0, Dependency-Track exclusively used the
/userinfoendpoint of the IdP to get user information.
Since v4.3.0, ID tokens are validated and evaluated as well. They even take precedence over/userinfo,
which means that Dependency-Track will no longer request the/userinfoendpoint if all required claims
are present in the ID token’s payload already.
How OpenID Connect claims are mapped #
When someone authenticates using OIDC, the claims provided in the ID token or /userinfo API response will be mapped to existing OIDC Groups and the user will be added to any teams which have those groups mapped. To have OIDC users added to a team, you must perform the following steps:
- Login to Dependency-Track as an administrator and navigate to Administration -> Access Management -> OpenID Connect Groups.
- Create a group with the name used in the OIDC team claim configured below. The value must match exactly, including case.
- If the team you want members of the OIDC group to join already exists, use the Mapped Teams menu to select it. If the team does not exist, open Administration -> Access Management -> Teams to create it and, after having done so, add the OIDC group to the Mapped OpenID Connect Groups list.
Example Configurations #
Generally, Dependency-Track can be used with any identity provider that implements the OpenID Connect standard. Multiple identity providers have been tested, the following are some example configurations that are known to work. Note that some providers may not support specific features like team synchronization, or require further configuration to make them work. If you find that the provider of your choice does not work with Dependency-Track, please file an issue.
For a complete overview of available configuration options for both API server and frontend, please refer to the Configuration page.
Auth0
| API server | Frontend |
|---|---|
| alpine.oidc.enabled=true | |
| alpine.oidc.client.id=9XgMg7bP7QbD74TZnzZ9Jhk9KHq3RPCM | OIDC_CLIENT_ID=9XgMg7bP7QbD74TZnzZ9Jhk9KHq3RPCM |
| alpine.oidc.issuer=https://example.auth0.com | OIDC_ISSUER=https://example.auth0.com |
| alpine.oidc.username.claim=nickname | |
| alpine.oidc.user.provisioning=true | |
| alpine.oidc.teams.claim=groups* | |
| alpine.oidc.team.synchronization=true* |
* Requires additional configuration
GitLab (gitlab.com)
| API server | Frontend |
|---|---|
| alpine.oidc.enabled=true | |
| alpine.oidc.client.id=ff53529a3806431e06b2930c07ab0275a9024a59873a0d5106dd67c4cd34e3be | OIDC_CLIENT_ID=ff53529a3806431e06b2930c07ab0275a9024a59873a0d5106dd67c4cd34e3be |
| alpine.oidc.issuer=https://gitlab.com | OIDC_ISSUER=https://gitlab.com |
| alpine.oidc.username.claim=nickname | |
| alpine.oidc.user.provisioning=true | |
| alpine.oidc.teams.claim=groups | |
| alpine.oidc.team.synchronization=true |
gitlab.com currently does not set the required CORS headers, see GitLab issue #209259.
For on-premise installations, this could be fixed by setting the required headers via reverse proxy.
Microsoft Entra ID
| API server | Frontend |
|---|---|
| alpine.oidc.enabled=true | |
| alpine.oidc.client.id=2e0a07ae-eabd-45d7-a8f5-ca4ad71b48ae | OIDC_CLIENT_ID=2e0a07ae-eabd-45d7-a8f5-ca4ad71b48ae |
| alpine.oidc.issuer=https://login.microsoftonline.com/3919df77-d4cd-4772-8b50-cfdb195bcdd6/v2.0 | OIDC_ISSUER=https://login.microsoftonline.com/3919df77-d4cd-4772-8b50-cfdb195bcdd6/v2.0 |
| alpine.oidc.username.claim=preferred_username | |
| alpine.oidc.user.provisioning=true | |
| alpine.oidc.teams.claim=groups | |
| alpine.oidc.team.synchronization=true |
OIDC integration with Microsoft Entra ID requires you to register Dependency-Track as an app in your tenant, see Microsoft Entra ID app registration.
The alpine.oidc.client.id contains the Application ID of the app registration, and the alpine.oidc.issuer contains the Directory (tenant) ID.
| API server | Frontend |
|---|---|
| alpine.oidc.enabled=true | |
| alpine.oidc.client.id= |
OIDC_CLIENT_ID= |
| alpine.oidc.issuer=https://accounts.google.com | OIDC_ISSUER=https://accounts.google.com |
| alpine.oidc.username.claim=email | OIDC_FLOW=implicit |
| alpine.oidc.user.provisioning=true |
Follow the docs to learn how to create the client id.
Set the redirect URI to <dependency track host>/static/oidc-callback.html
Keycloak
| API server | Frontend |
|---|---|
| alpine.oidc.enabled=true | |
| alpine.oidc.client.id=dependency-track | OIDC_CLIENT_ID=dependency-track |
| alpine.oidc.issuer=https://auth.example.com/auth/realms/example | OIDC_ISSUER=https://auth.example.com/auth/realms/example |
| alpine.oidc.username.claim=preferred_username | |
| alpine.oidc.user.provisioning=true | |
| alpine.oidc.teams.claim=groups* | |
| alpine.oidc.team.synchronization=true* |
* Requires additional configuration, see Example setup with Keycloak
OneLogin
| API server | Frontend |
|---|---|
| alpine.oidc.enabled=true | |
| alpine.oidc.client.id=a9eb980a-fake-45f9-96e0-0891ff63d00d* | OIDC_CLIENT_ID=a9eb980a-fake-45f9-96e0-0891ff63d00d* |
| alpine.oidc.issuer=https://example.onelogin.com/oidc/2 | OIDC_ISSUER=https://example.onelogin.com/oidc/2 |
| alpine.oidc.username.claim=email | |
| alpine.oidc.user.provisioning=true | |
| alpine.oidc.teams.claim=groups | OIDC_SCOPE=openid profile email groups |
| alpine.oidc.team.synchronization=true |
* Requires additional configuration, see Example setup with OneLogin
AWS Cognito
| API server | Frontend |
|---|---|
| alpine.oidc.enabled=true | |
| alpine.oidc.client.id=6s7fpripfp87v3khbn87ioq5a3* | OIDC_CLIENT_ID=6s7fpripfp87v3khbn87ioq5a3 |
| alpine.oidc.issuer=https://cognito-idp.region.amazonaws.com/region_pool-id | OIDC_ISSUER=https://cognito-idp.region.amazonaws.com/region_pool-id |
| alpine.oidc.username.claim=email | OIDC_SCOPE=email openid* |
| alpine.oidc.user.provisioning=true | |
| alpine.oidc.teams.claim=cognito:groups | |
| alpine.oidc.team.synchronization=true* |
* Requires additional configuration. See Example setup with AWS Cognito
Default Groups #
In cases where team synchronization is not possible, auto-provisioned users can be assigned one or more default teams.
alpine.oidc.teams.default=TeamA,TeamB
Note that this feature is intended to be used specifically when team synchronization is disabled. If team synchronization is enabled, memberships will be reset upon next login of the respective user.
Example setup with Keycloak #
The following steps demonstrate how to setup OpenID Connect with Keycloak. Most settings should be applicable to other IdPs as well.
This guide assumes that:
- the Dependency-Track frontend has been deployed to
https://dependencytrack.example.com- a Keycloak instance is available at
https://auth.example.com- the realm example has been created in Keycloak
-
Configure the client as shown below:
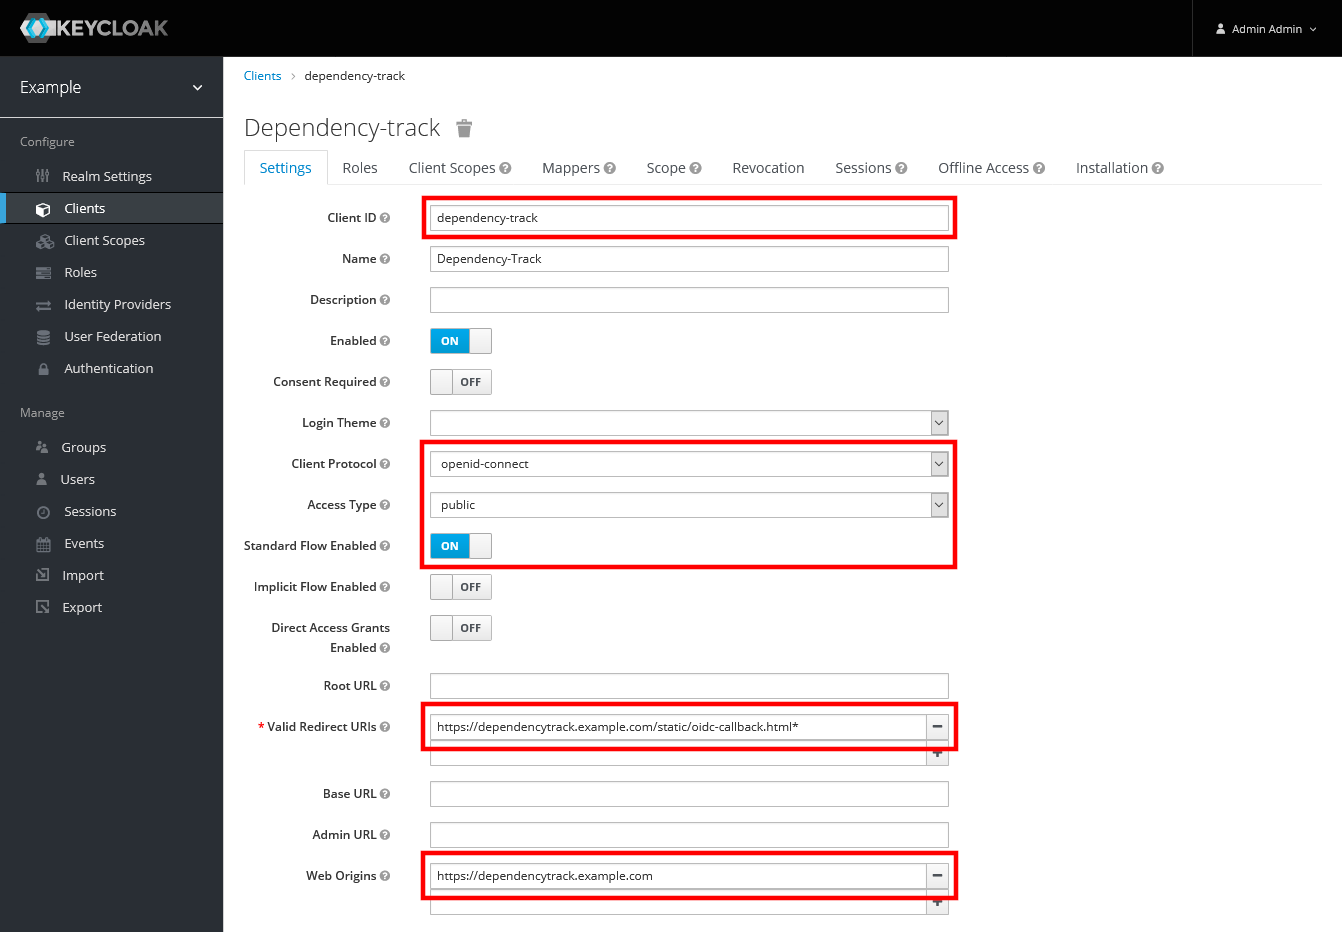
- Client ID:
dependency-track - Client Protocol:
openid-connect - Access Type:
public - Standard Flow Enabled:
ON - Valid Redirect URIs:
https://dependencytrack.example.com/static/oidc-callback.html- A trailing wildcard (
*) was required when using frontend v1.3.0-v4.3.0, in order to support post-login redirects - Starting with v4.4.0, the trailing wildcard is no longer necessary
- A trailing wildcard (
- Web Origins:
https://dependencytrack.example.com
- Client ID:
-
To be able to synchronize team memberships, create a protocol mapper that includes group memberships as
groupsin the/userinfoendpoint:
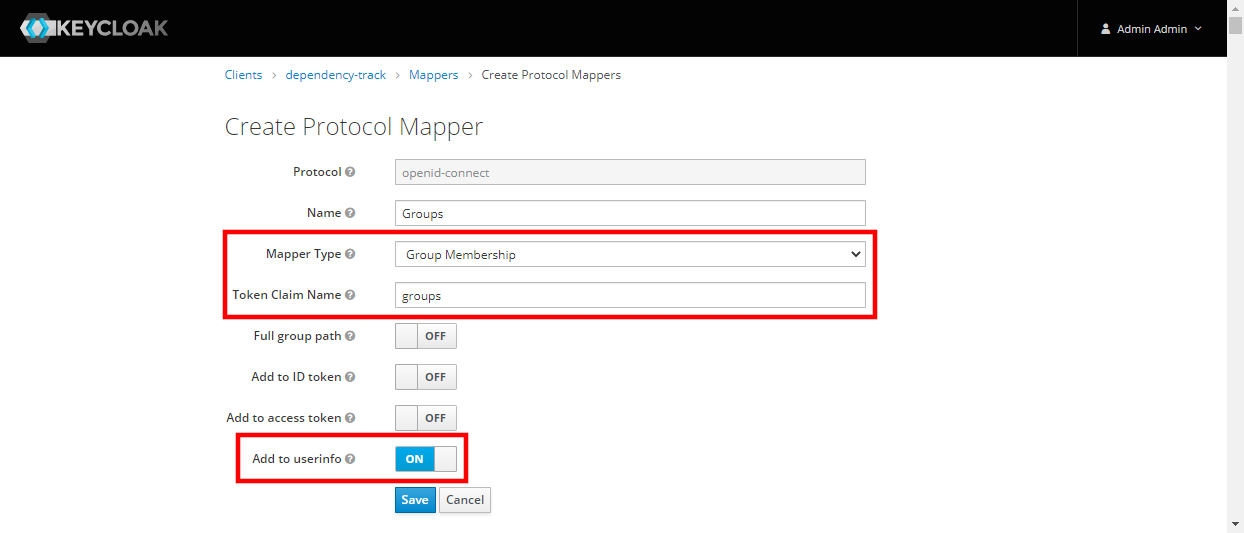
    * Mapper Type: `Group Membership`
    * Token Claim Name: `groups`
    * Add to userinfo: `ON` (optional for Dependency-Track v4.3.0 and newer)
    * Add to ID token: `ON` (for Dependency-Track v4.3.0 and newer)
-
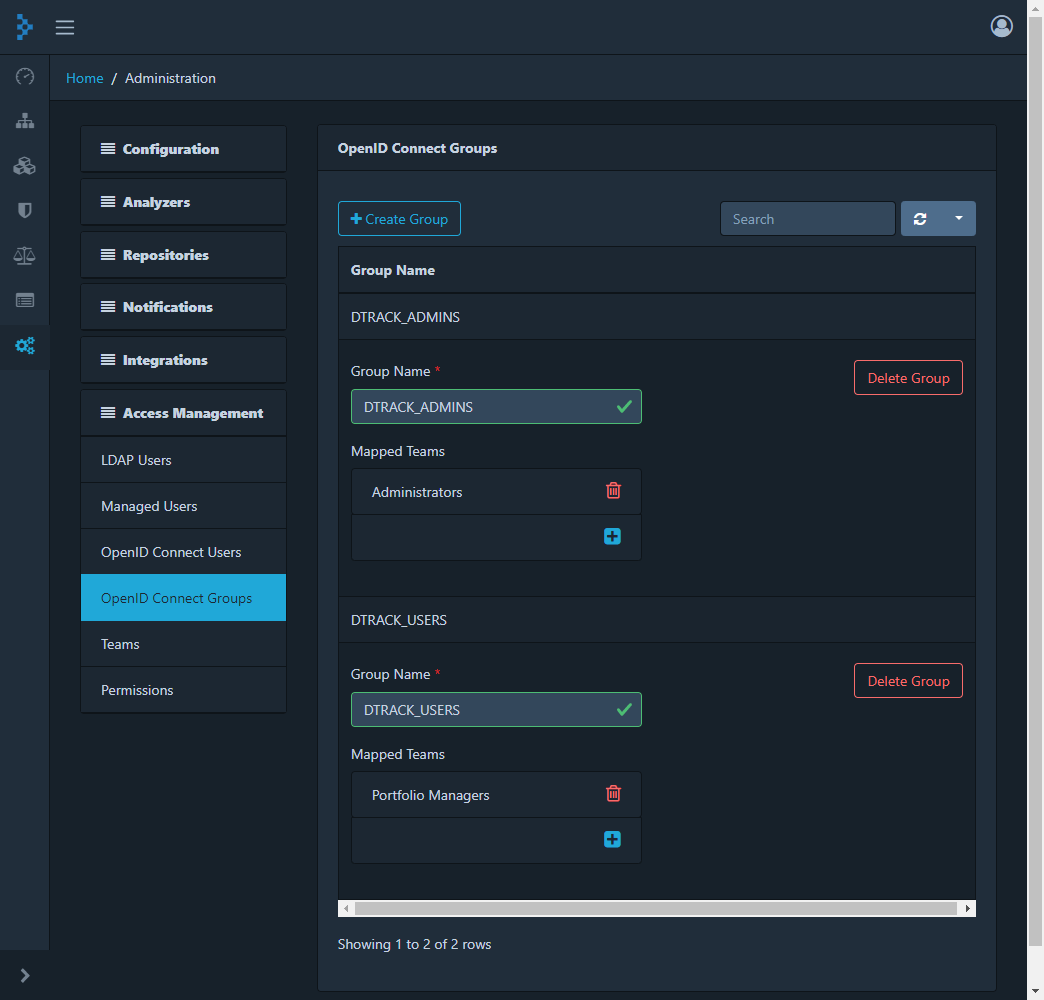
Create some groups, e.g.
DTRACK_ADMINSandDTRACK_USERS: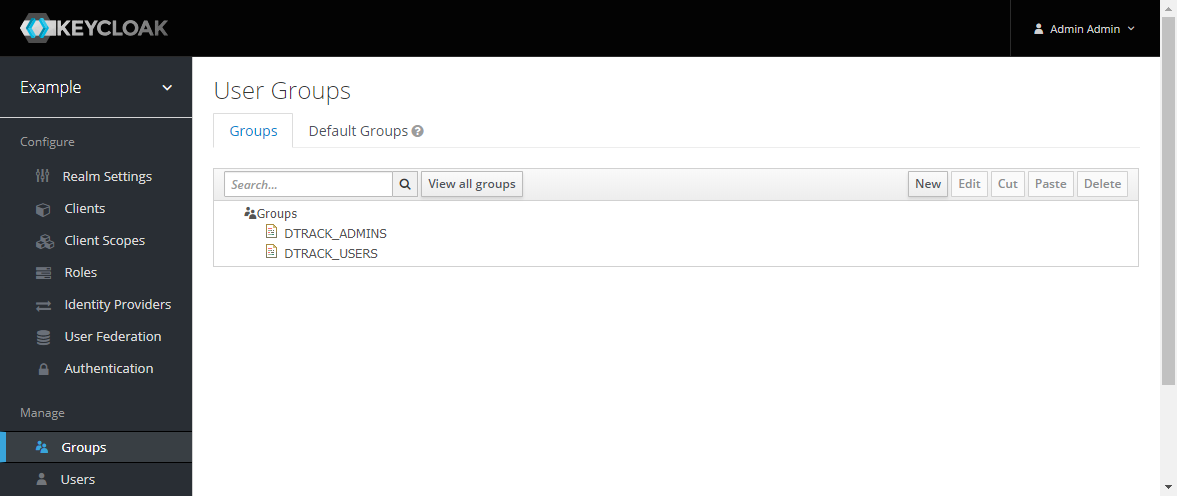
-
Verify that all required claims are present in the
/userinfoendpoint
- Acquire an access token for a user and call
/userinfowith it - You can temporarily set Direct Access Grants Enabled to
ONin the client settings to enable the Resource Owner Password Credentials Grant
$ ACCESS_TOKEN=$(curl https://auth.example.com/auth/realms/example/protocol/openid-connect/token \
    -d "client_id=dependency-track" \
    -d "grant_type=password" \
    -d "username=demo-user" \
    -d "password=demo-pass" \
    | jq -r .access_token)
$ curl https://auth.example.com/auth/realms/example/protocol/openid-connect/userinfo \
    -H "Authorization: Bearer $ACCESS_TOKEN"
- The response should look similar to this:
{
  "groups": ["DTRACK_USERS"],
  "sub": "290e5d27-25d2-414c-a04c-5d03cd0e1db8",
  "email_verified": true,
  "preferred_username": "demo-user",
  "email": "[email protected]"
}
-
Configure OIDC for both API server and frontend of Dependency-Track, as demonstrated below for a docker-compose deployment:
version: "3" services: dtrack: image: dependencytrack/dependency-track environment: # ... - "ALPINE_OIDC_ENABLED=true" - "ALPINE_OIDC_CLIENT_ID=dependency-track" - "ALPINE_OIDC_ISSUER=https://auth.example.com/auth/realms/example" - "ALPINE_OIDC_USERNAME_CLAIM=preferred_username" - "ALPINE_OIDC_TEAMS_CLAIM=groups" - "ALPINE_OIDC_USER_PROVISIONING=true" - "ALPINE_OIDC_TEAM_SYNCHRONIZATION=true" dtrack-frontend: image: dependencytrack/frontend environment: # ... - "OIDC_ISSUER=https://auth.example.com/auth/realms/example" - "OIDC_CLIENT_ID=dependency-track" -
Login to Dependency-Track as
adminand navigate to Administration -> Access Management -> OpenID Connect Groups
- Create groups with names equivalent to those in Keycloak (these must match exactly, including case)
-
Add teams that the groups should be mapped to
-
Use the OpenID button on the login page to sign in with a Keycloak user that is member of at least one of the configured groups. Navigating to Administration -> Access Management -> OpenID Connect Users should now reveal that the user has been automatically provisioned and team memberships have been synchronized:
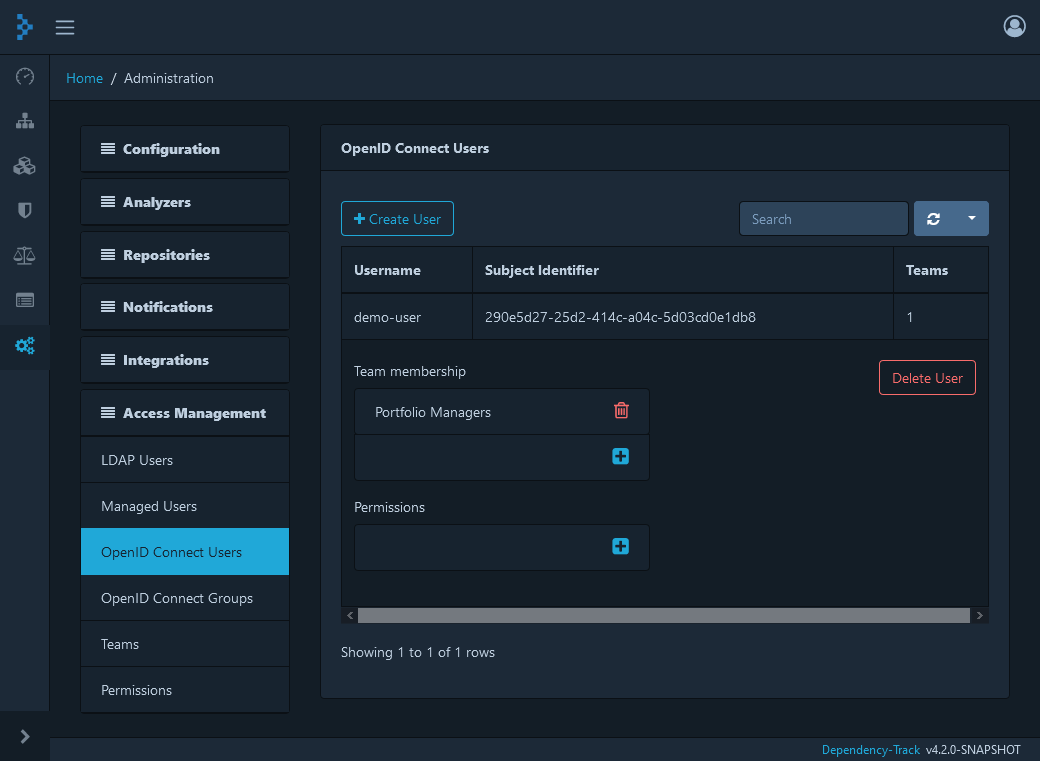
Dependency-Track associates every OpenID Connect user with their subject identifier (
subclaim of the access token) upon first login. If a user with the same name but a different subject identifier attempts to log in via OIDC, Dependency-Track will refuse to authenticate that user. This is done to prevent account takeovers, as some identity providers allow users to change their usernames. Also, uniqueness of usernames is not always guaranteed, while the uniqueness of subject identifiers is.
Example setup with OneLogin #
The following steps demonstrate how to setup OpenID Connect with OneLogin.
This guide assumes that:
- the Dependency-Track frontend has been deployed to
https://dependency-track.example.com- a OneLogin instance is available at
https://example.onelogin.com
- Log in to OneLogin and navigate to Administration -> Applications -> Add App
- Search for OpenID Connect (OIDC)

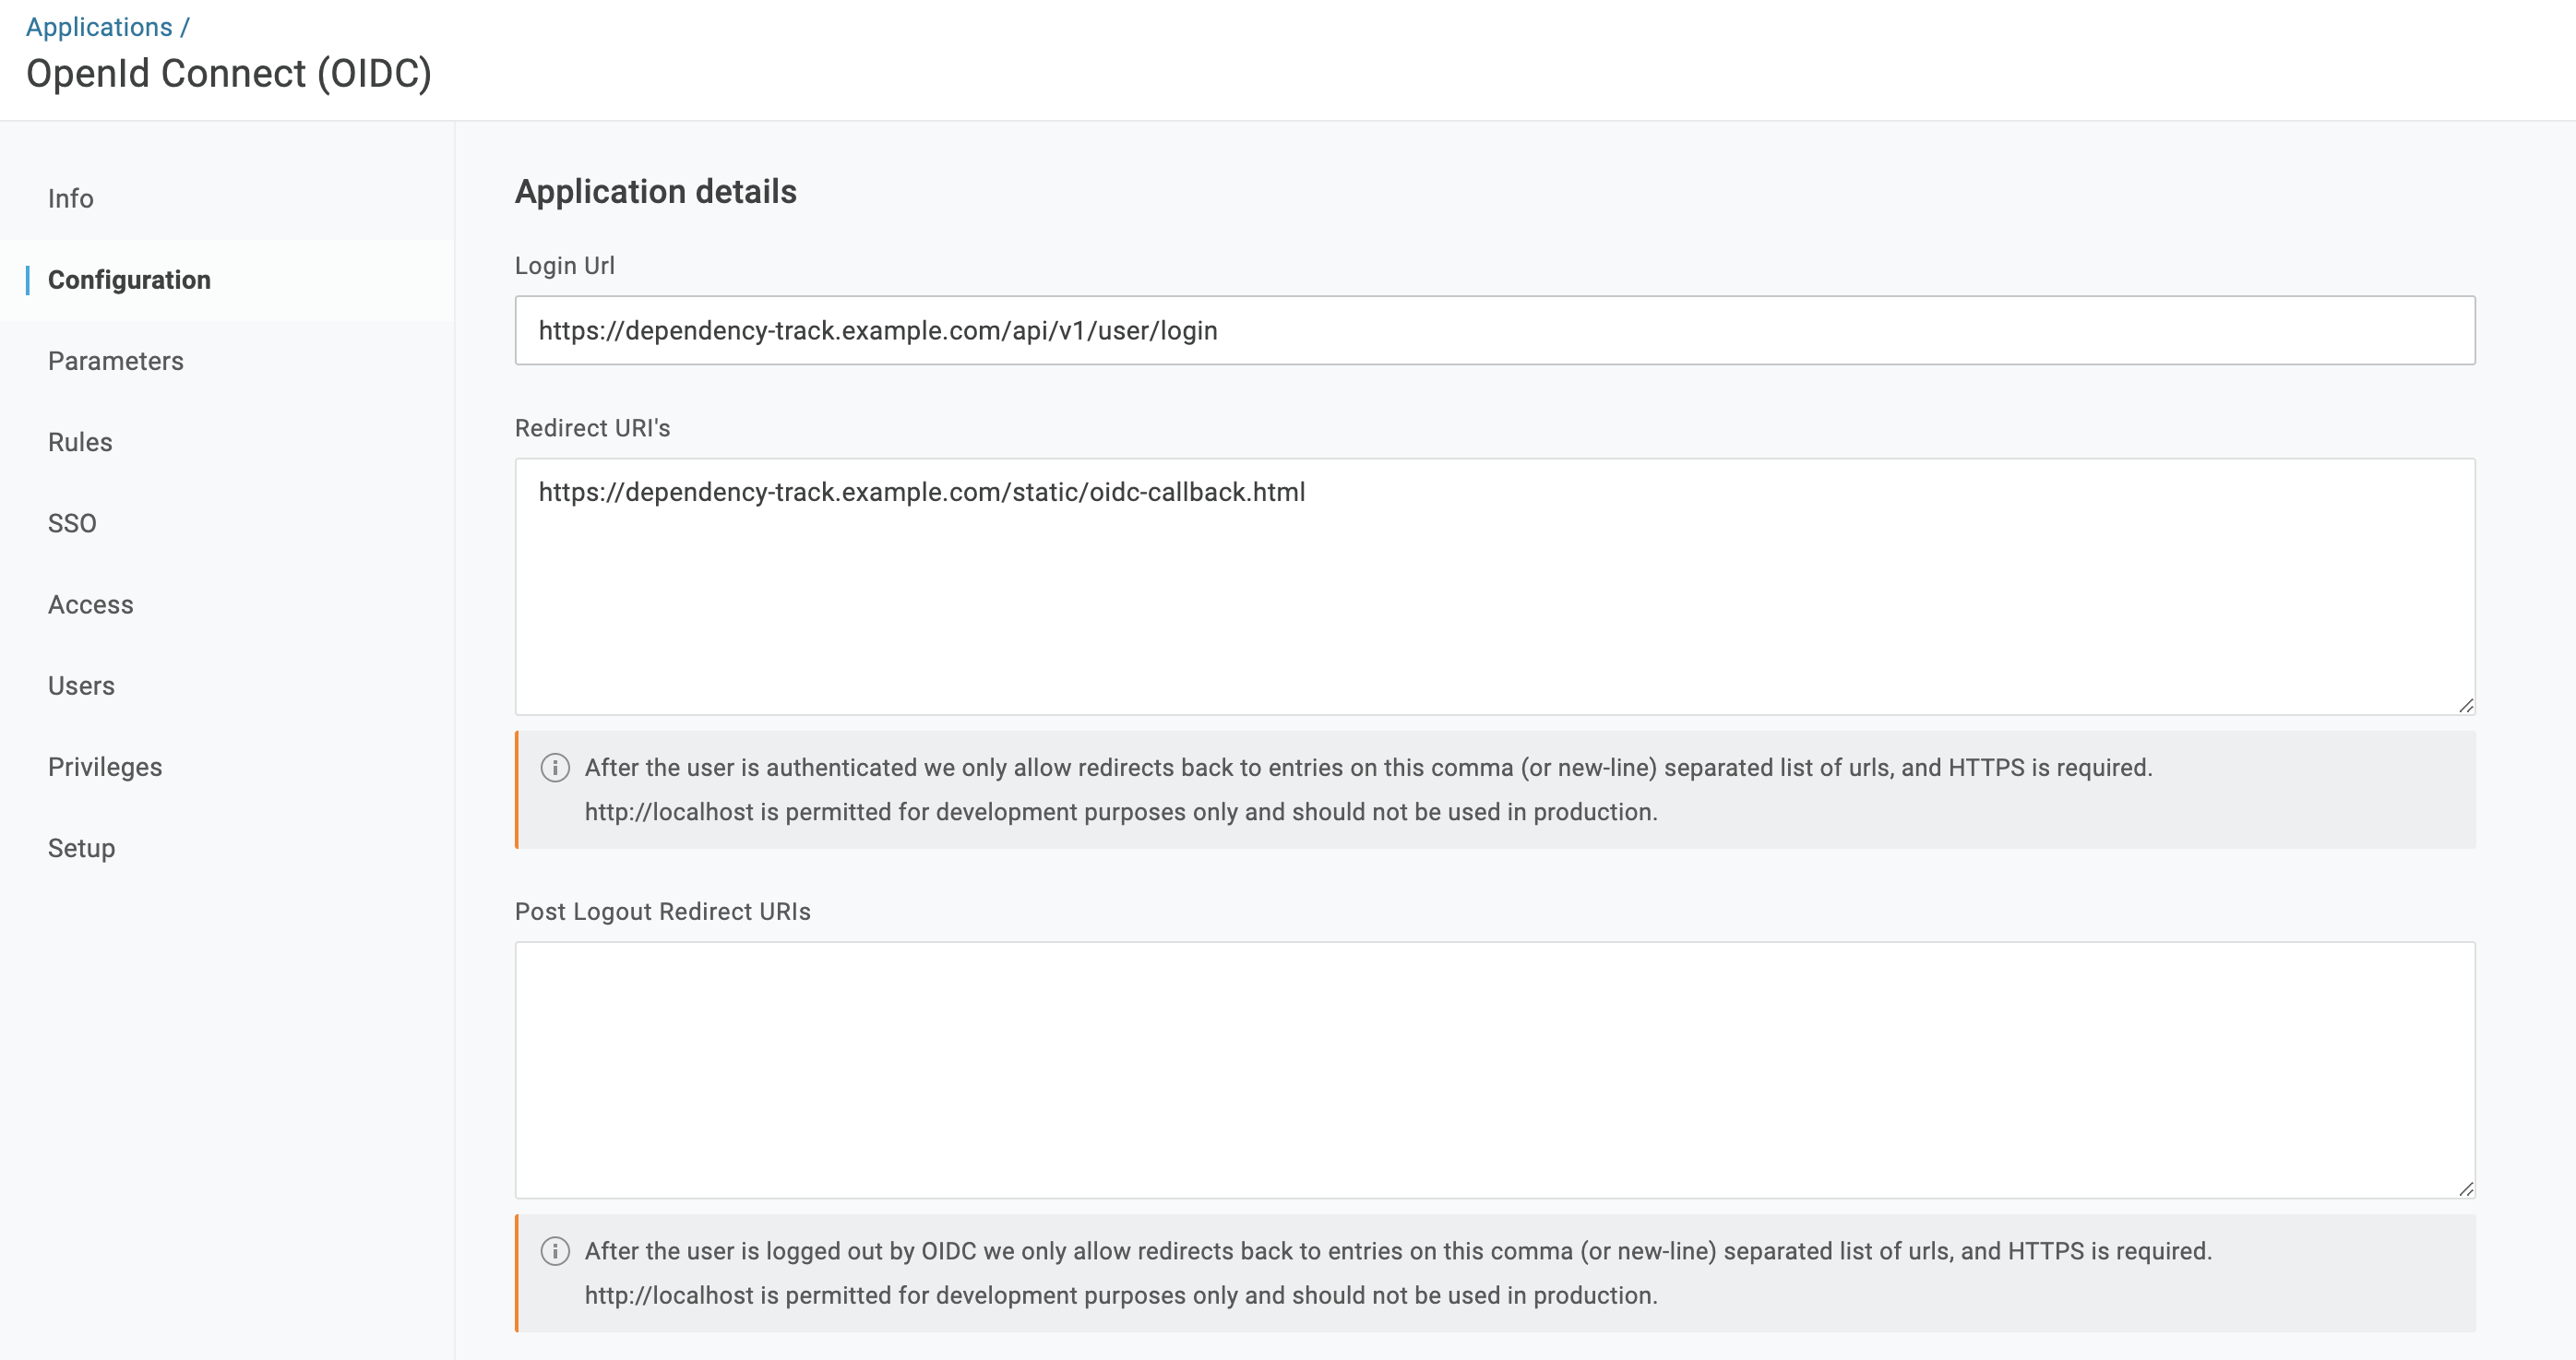
- In the Configuration section, set the following values:
- Login Url:
http://dependency-track.example.com/api/v1/user/login - Redirect URI’s:
https://dependency-track.example.com/static/oidc-callback.html
- Login Url:
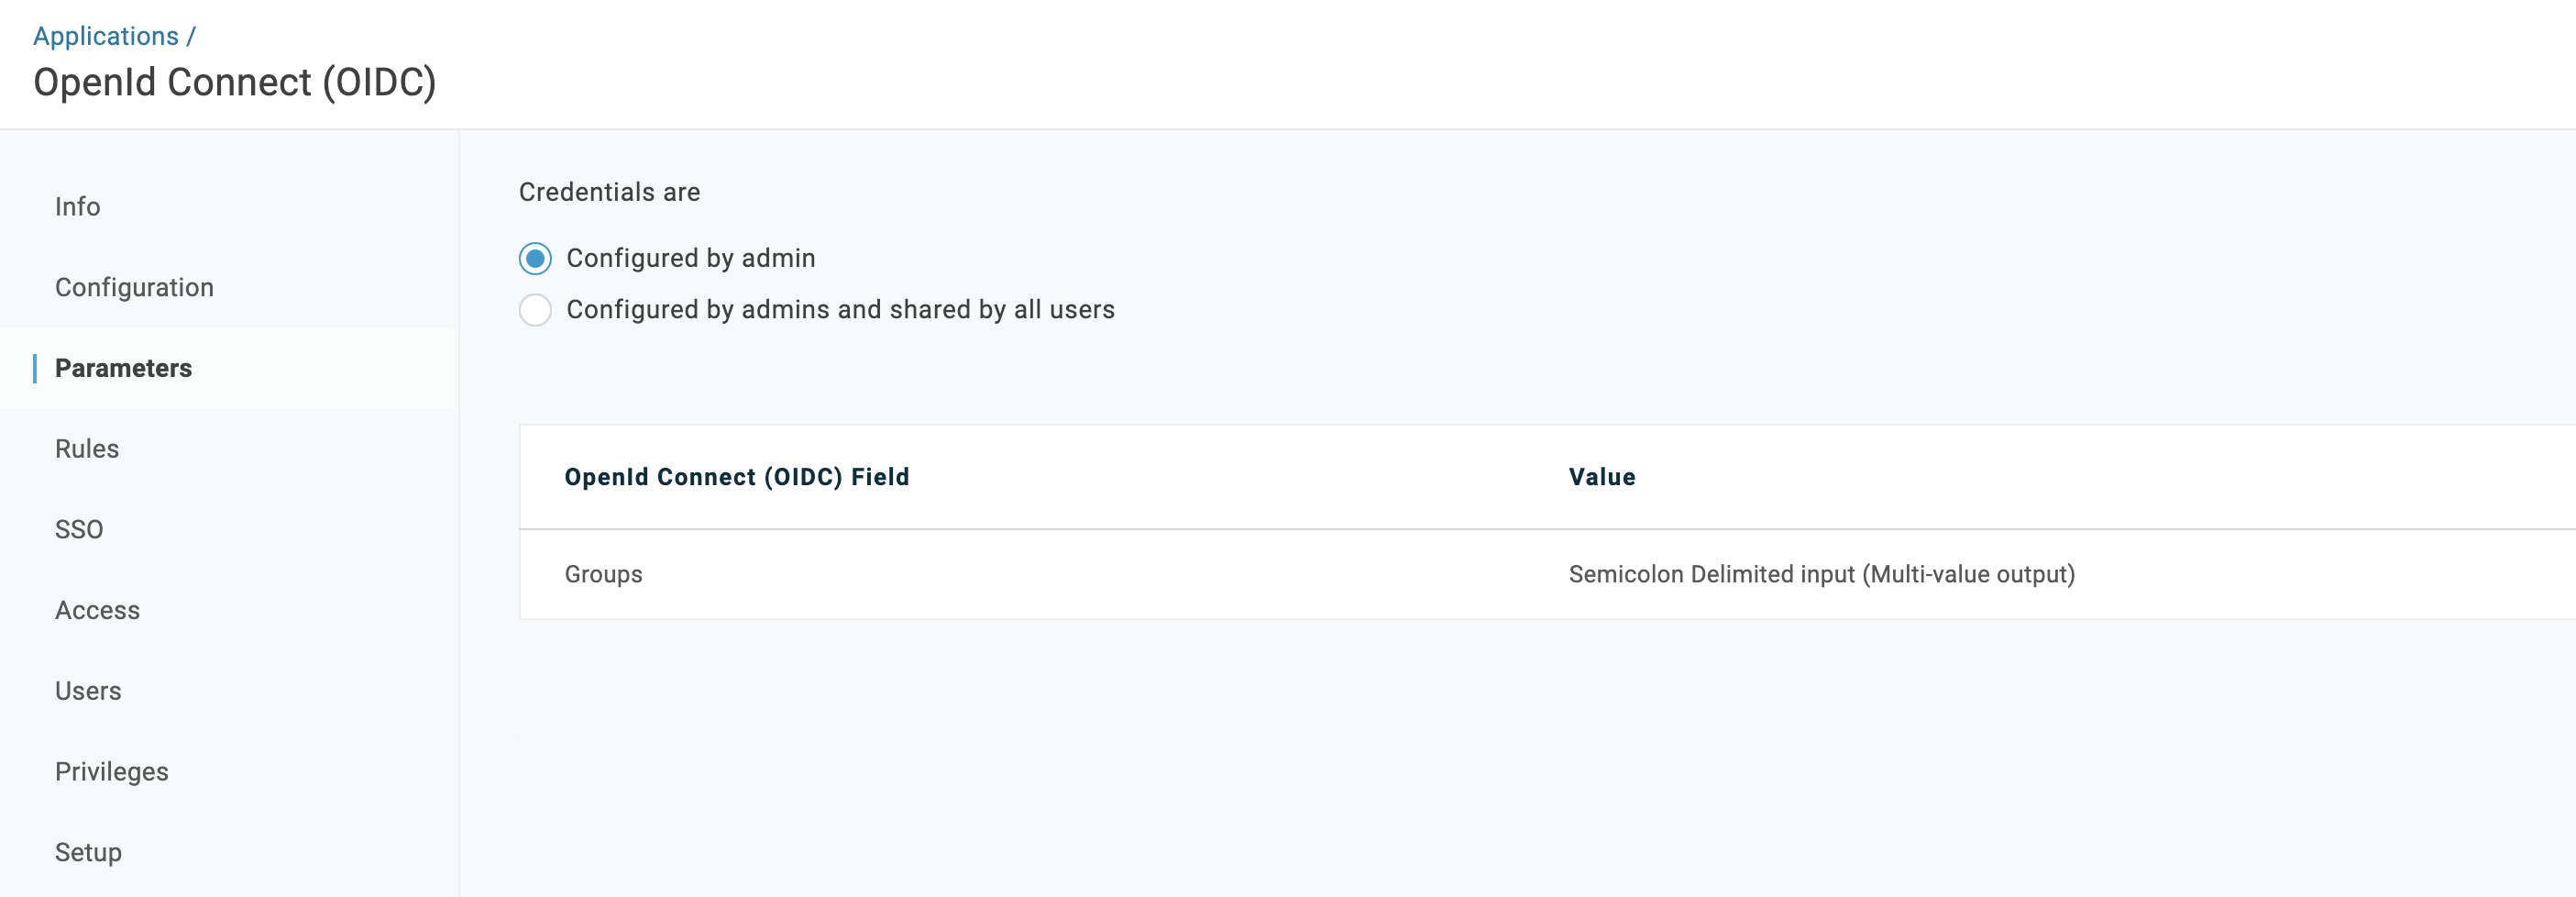
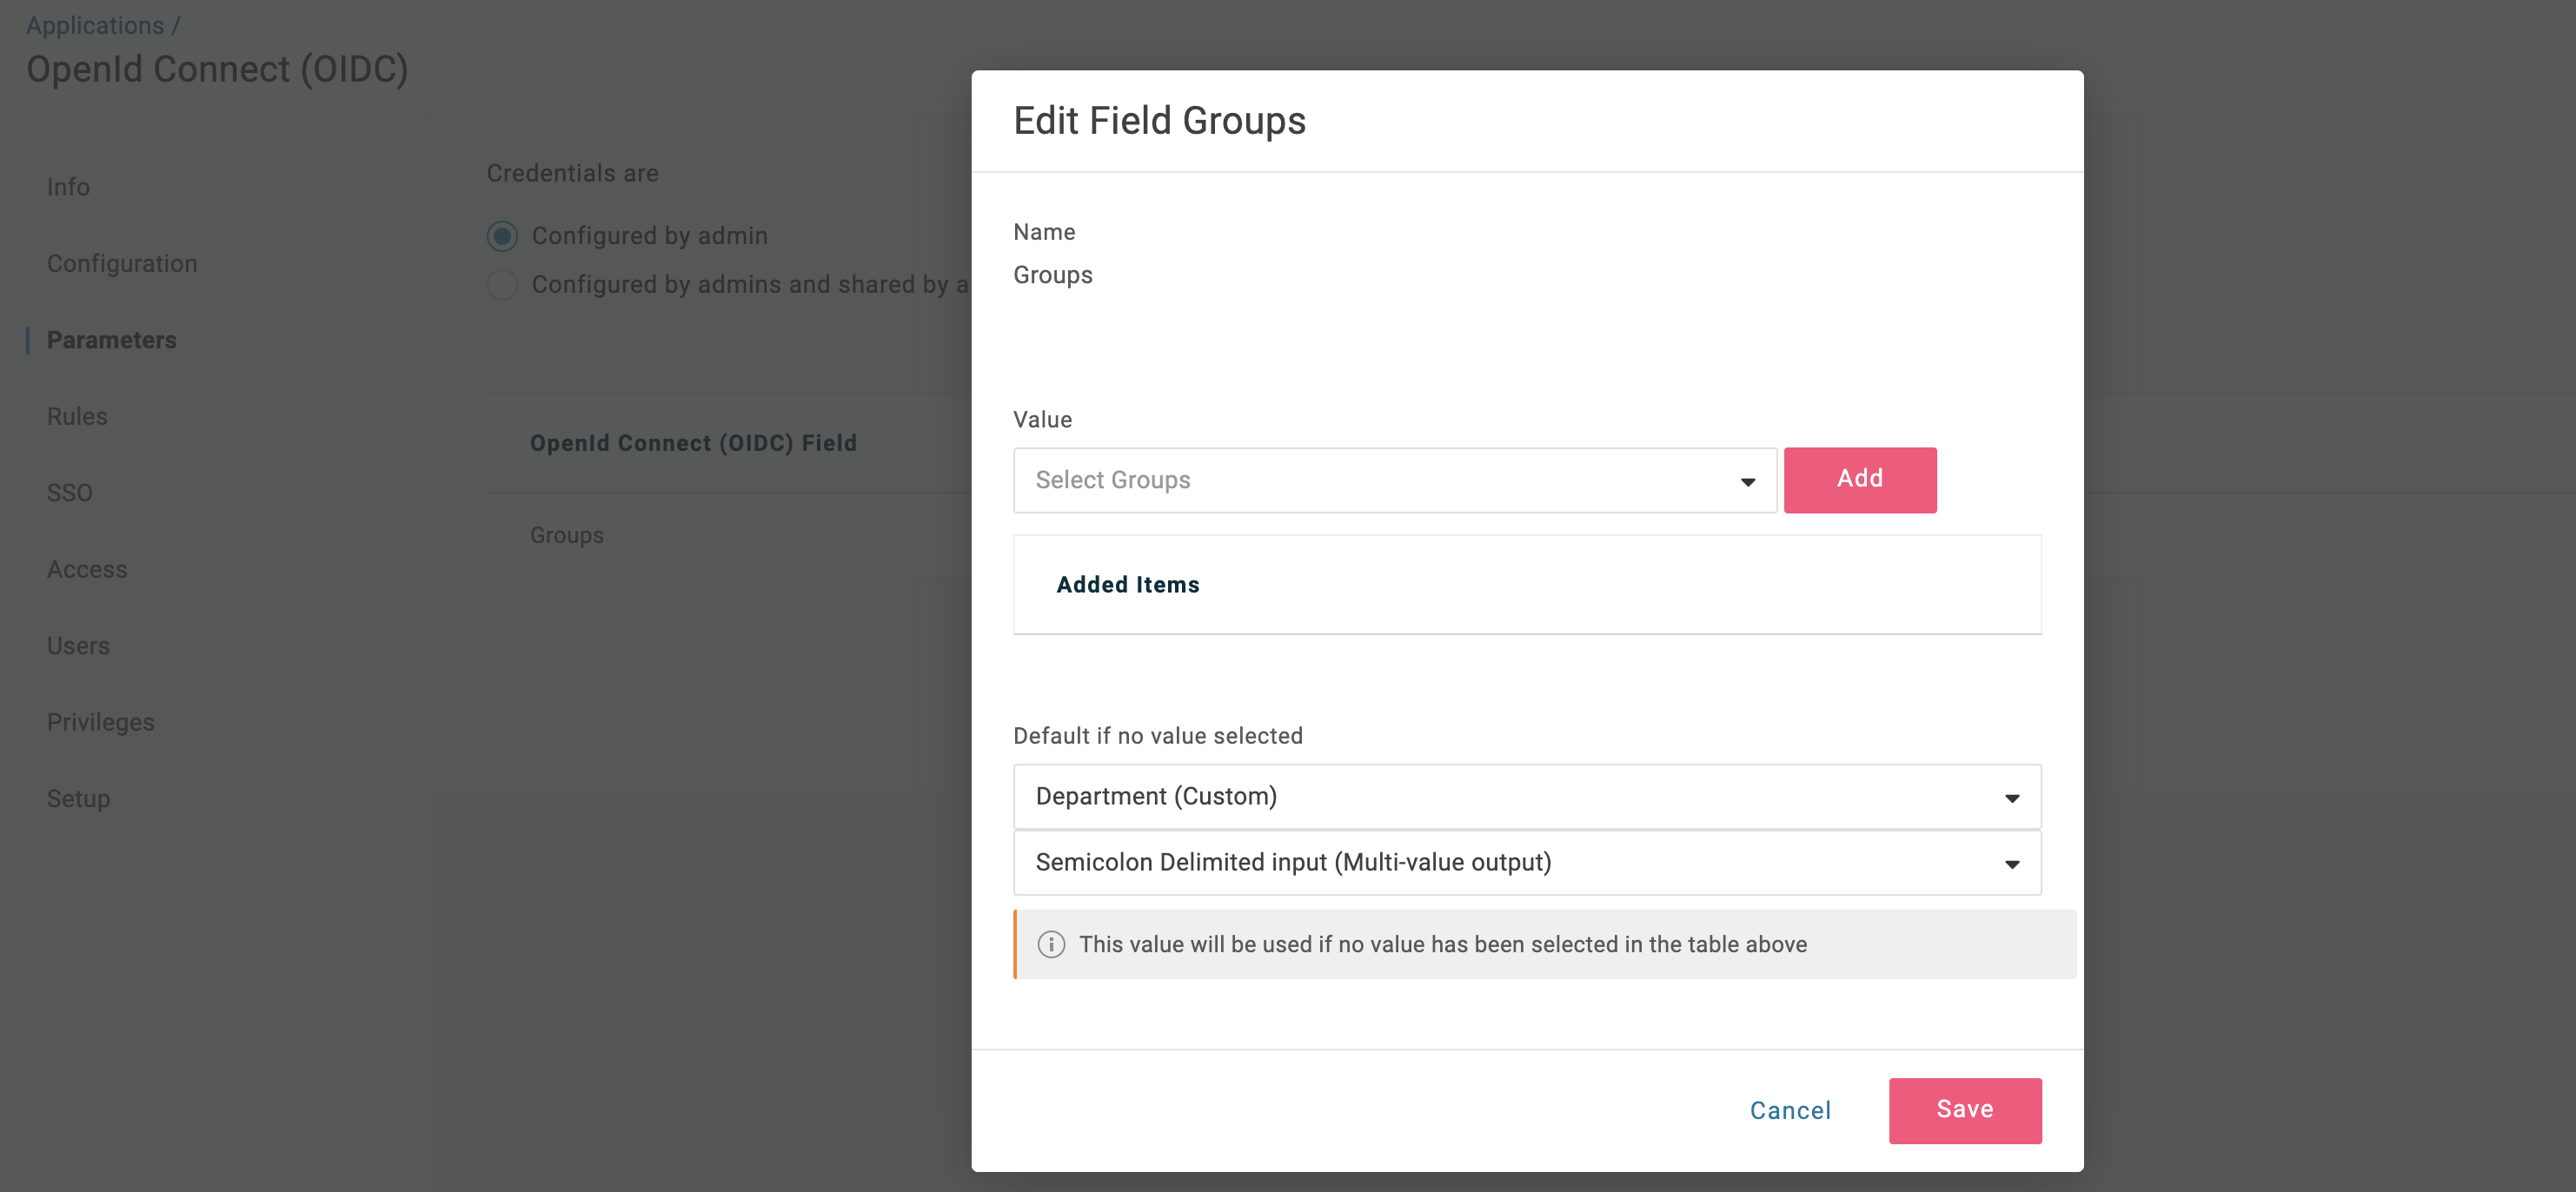
- In the Parameters section, click on the
GroupsOpenId Connect (OIDC) Field and set the following values:- Default:
Department (Custom)(for team synchronization, this must be the field that you use for the user’s groups, e.g. Department, Team, Role, etc.) - Transform:
Semicolon Delimited Input (Multi-value output)
- Default:
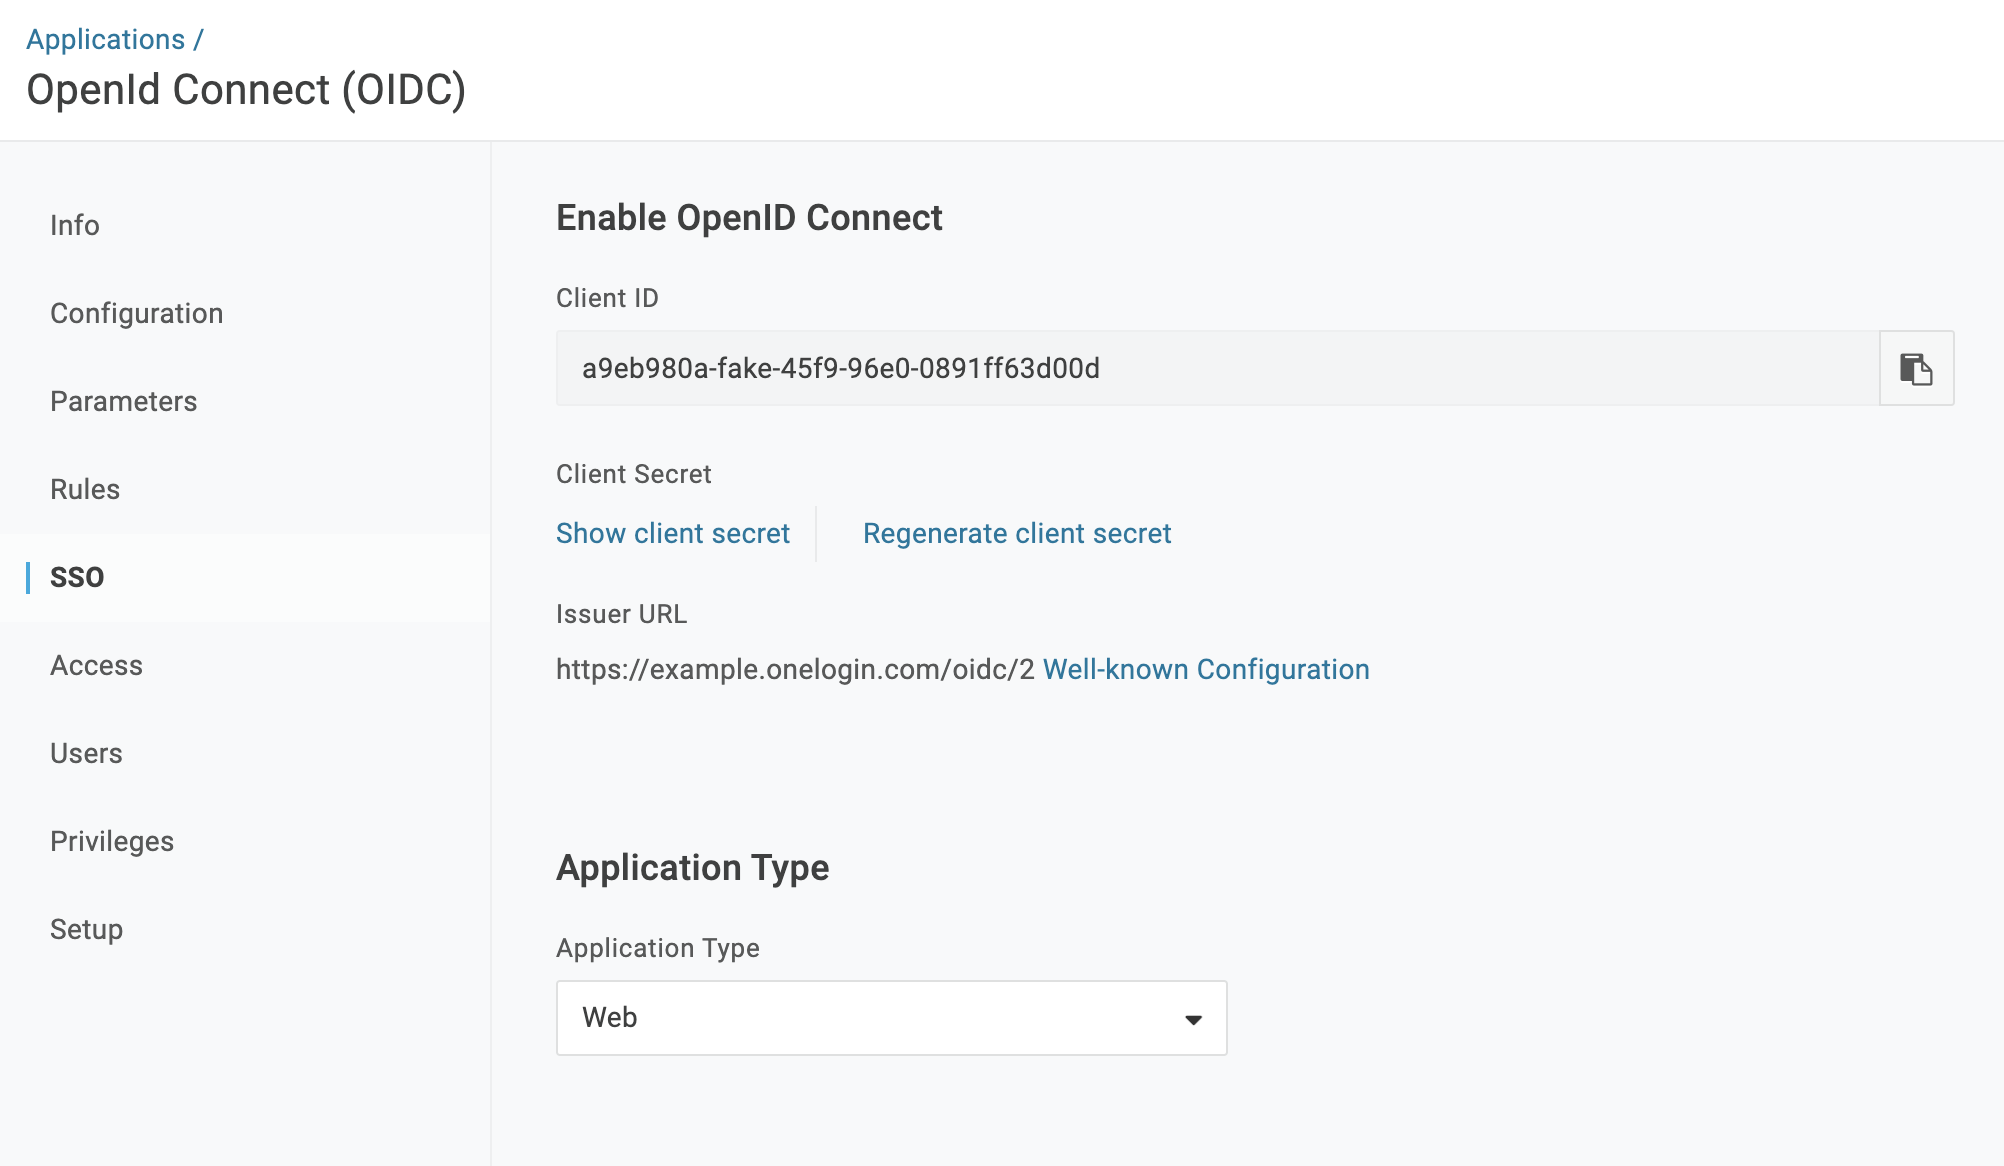
- In the SSO section, copy the
Client IDand use it to set thealpine.oidc.client.idandOIDC_CLIENT_IDconfiguration values in the API server and frontend respectively
- Login to Dependency-Track as an admin and navigate to Administration -> Access Management -> OpenID Connect Groups
- Create groups with names equivalent to those in OneLogin (these must match exactly, including case, with the values of the
Groupsfield set in the Parameters section) - Add teams that the groups should be mapped to
- Create groups with names equivalent to those in OneLogin (these must match exactly, including case, with the values of the
- Use the OpenID button on the login page to sign in with a OneLogin user that is member of at least one of the configured groups. Navigating to Administration -> Access Management -> OpenID Connect Users should now reveal that the user has been automatically provisioned and team memberships have been synchronized
Microsoft Entra ID app registration #
The following steps demonstrate how to setup OpenID Connect with Microsoft Entra ID.
This guide assumes that:
- the Dependency-Track frontend has been deployed to
https://dependencytrack.example.com- an Microsoft Entra ID tenant has been created
-
Add an app registration for Dependency-Track to your Microsoft Entra ID tenant:
- Name:
Dependency-Track - Supported account types:
Accounts in this organizational directory only - Redirect URI (optional): Leave empty for now
- Name:
-
Under Authentication:
- Add
https://dependencytrack.example.com/static/oidc-callback.htmlas a Single Page Application Redirect URI - leave all settings at default:
- Add
-
Under Token configuration:
- Click Add groups claim
- Select the appropriate group types to include in the token:
- If you are testing in a personal environment, you may enable Security Groups.
- For corporate environments, where users may belong to thousands of groups, it is recommended to choice only
Groups assigned to the application. This prevents exceeding the token’s size limit, which could lead to authentication failures.
- Recommended setting for production: Select
Groups assigned to the applicationto ensure optimal performance and avoid Single Sign-On (SSO) issues. See #2150 for more details.
- Under API permissions, add the following Microsoft Graph API permissions:
- OpenId permissions -> email
- OpenId permissions -> openid
- OpenId permissions -> profile
- GroupMember -> GroupMember.Read.All
- Note that Entra will return the group UUID in the claims (not the group name).
Example setup with AWS Cognito #
The following steps demonstrate how to setup OpenID Connect with AWS Cognito.
This guide assumes that:
- the Dependency-Track frontend has been deployed to
https://dependency-track.example.com- You have user pool in AWS Cognito
- You have AWS Cognito Groups to associate with Dependency Track, e.g. Admins, Users
-
Log in to AWS and navigate to Cognito -> Applications -> App Clients
- Create AppClient:
- Type: Mobile App or SPA
- Redirect URI’s:
https://dependency-track.example.com/static/oidc-callback.html
- In the Login Pages section of created App Client set:
- OAuth grant types:
Authorization code grant - OpenID Connect scopes:
openid email
- OAuth grant types:
- Copy:
Client IDauthority(OIDC_ISSUER) - you can find it in Quick setup guide section.
-
Adjust Dependency Track apiserver and frontend OIDC configurations and restart them.
- Login to Dependency-Track as an admin and navigate to Administration -> Access Management -> OpenID Connect Groups
- Create groups with names equivalent to those in AWS Cognito you want to associate with Dependency Track (these must match exactly, including case)
- Add teams that the groups should be mapped to
- Use the OpenID button on the login page to sign in with AWS Cognito user that is member of at least one of the configured groups. Navigating to Administration -> Access Management -> OpenID Connect Users should now reveal that the user has been automatically provisioned and team memberships have been synchronized